At the NSA 1998 convention I bought from my friend Harry Poster a VM dedicated flash gun which, of course, takes P5 or P25 flash bulbs. I believe that Dalia Miller has them occasionally as well. Originally I was going to hack the flash gun and use its base and put a hot shoe onto it to make a total electronic flash gun for the Personal. I saw one owned by a delightful young woman named Carol at the convention and it looked exactly what I wanted to build. She was kind enough to show me the flash adapter and I felt that this was the way.
Enter my psychotic nature: I find it hard to hack a perfectly
fine working instrument. I originally asked Harry for a VM flash
gun in sorry shape so I could hack it. He only had good ones, and
I bought one (bargain prices from Harry always). I sat at home bemoaning
my impending violation of the instrument when the idea struck me.
Here then is (to my thinking) the perfect way to adapt your VM flash gun
into an electronic strobe and still maintain the integrity of the flash
gun as a 50s bulb popper !!
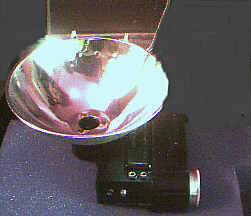
STEP 1: Get a VM flash gun and apply it to your Personal.
Load 3 AA batteries into it and load it with a P5 or P25 bulb. Aim
it at someone who never had a bulb popped at them before. (I used
my 18 year old daughter, Elisabeth.) Take their picture and watch
them try to grab for the white blotch drilled into their eyes for a while.
(Mild sadism). Save the bulb.
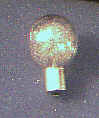
STEP 2: Remove the bulb from the flash gun, and when it's
completely cooled, lightly tap on it to break the glass inside (I used
a Zippo lighter to do my tapping), but don't break the protective laminate
around it. When you have one maraca, pierce the protective laminate
and pour out the glass shards. You can now safely remove the laminate.
You now have a bulb base with the filaments protruding. You can remove
the filaments.
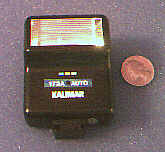
STEP 3: Now you have to get yourself the smallest strobe you
can find. I got a Kalimar 173a Auto Flash which measures 3.125"
high, 1.50" deep and 2.25" high. The PC connector is on the rear
of the little unit. I paid the thief in my local camera shop $20
for it. Your thieves may vary as per price.
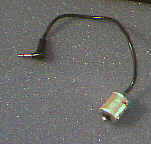
STEP 4: Take the PC connector wire and lop off the PC plug and strip the insulation off of it. Separate the hot lead from the ground. Now get out your Dremel. All 3D folks own Dremels.
STEP 5: With a really tiny drill bit, drill a hole into the base of the bulb base. Put the base into a vice (lightly enough not to squash it) and drill from the inside of the base in order to get as much to the center as possible. Examine the base and you'll see on the outside wall where the ground lead of the original bulb structure was soldered. Drill a similar hole next to that.
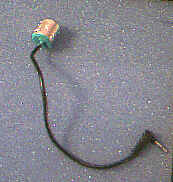
STEP 6: Now insert your prepared PC wire into the bulb putting
the hot lead into the base and solder it in place from the underside.
(Don't make too much of a solder blob.) Next slip the ground lead
through the hole on the side and solder it to the wall, again from the
outside. (very small blob here.)
STEP 7: Open the battery compartment of the VM flash gun and
put something inside where the batteries should be to make the complete
connection. You can use just about anything to make the connection:
wads of aluminum foil, dead batteries (don't forget to change them occasionally
so's they don't leak), no longer good rechargeables, etc.* You can
also solder wires to the plus and minus poles of the 3 battery areas, but
if you do, you won't be able to use the gun as a bulb popper any more.
STEP 8: Now test what you've done. Insert the adapter you've just made into the flash gun and screw the gun onto your Personal. Hit the shutter (you needn't advance the film to do this). If it flashes properly, you're cookin'. If not, open the bottom of the Personal (it's easy) and adjust the contacts inside to make the proper zap.
STEP 9: Remove your adapter from the flash gun and put it into
a vice open side toward you. Fill the open area with Duco Cement.
In about an hour, adjust the PC wire to the center of the cement (it will
be the consistency of Jell-O) and let dry overnight or more. The
Duco Cement will harden and give you a good deal of sturdiness and protect
the wire from getting yanked out.
STEP 10: Drill two small holes on either side of the flash gun reflector
using the little strobe as your guide, in order to span a fairly thin spring
across the strobe to hold it in place. Make sure not to interfere
with the VM flash's plastic safety flash guard, that is to say it should
close naturally. Plug your adapter into the flash gun, plug the connector
wire into the strobe, fasten the strobe under the spring, close the safety
guard, and I'm your uncle!! (I'm Bob).

If you have any comments or improvements upon this project, please
e-mail me at bobstern@optonline.net or radioguy@been-there.com
Also, please feel free to save this page to disk or print it out. Its the very least that I could do for all the 3D people who've helped
me out through the years.**
I hope this helps those like me solve the ongoing quest for a useful
View Master flash adapter!
Bob (the Radio Guy) Stern
* I have received reports from two people who built this adapter who said that while the strobe fired when using dead batteries in the VM flash gun's chamber without advancing the film, it did not fire when the shutter had to operate (that is, when after advancing the film thereby cocking the shutter for firing). They replaced the three dead AA batteries with live, fresh ones and all is well. I, personally, didn't have that experience; but if you do, there's the fix. (added 3/12/99)