Sputnik Modifications


This material copyright © 1996 Sam Smith - reproduced here with Sam's permission.

DISCLAIMER: Please note that there is a certain amount of risk involved in this project or any modification. Please assess your own skills carefully, as I am not liable for any damage to person or property.

Notes:

  1. Although I really hate the viewfinder, I've left it intact for the time being. I would like to replace the big viewing lens with a ground glass, then add a prism to the top, like the 45 degree prism the Russians made for their Hasselblad copy, the Kiev.
  2. On my version, I've installed a flash shoe on the top plate. This was salvaged from an old folder and attached to my top plate with screws. I use a Sunpak Auto Zoom 2400 with several tilt positions. Placement of the shoe will depend on the type of flash you use.

The Russian Sputnik stereo camera is the only medium format stereo camera that was mass produced after 1960, and surely the easiest to find. Its reasonable price on the collectors' market has helped bring many into the field of MF stereo. Unfortunately, it is a camera of many design faults. The most serious are light leaks, internal reflections and lens flare. Once these problems are eliminated or at least reduced, the Sputnik is capable of producing excellent results. This guide gives you my suggestions only, as there may be other ways of improving performance as well. Some of the modifications are reversible, an advantage should you decide later you would rather return your Sputnik to its original state. While far from definitive, these suggestions may prove useful for those who have despaired over the poor quality of their Sputnik images.


HERE'S A BRIEF LIST OF RECOMMENDED MODIFICATIONS:
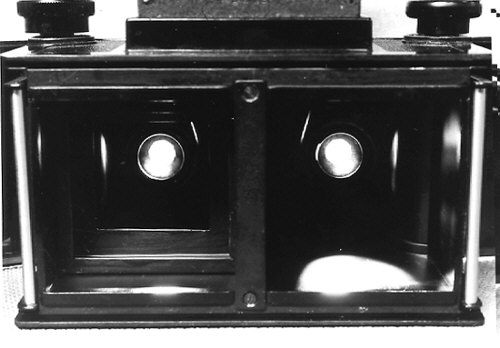


PLEASE NOTE: As Sputniks differ from body to body, all dimensions here are approximations only. Please measure your own camera carefully before making baffles or plates.

Internal Reflections

Probably the silliest of design concepts was having a shiny surface to the inner chambers of the Sputnik. Light reflects off the sides and fogs the image, thereby greatly reducing contrast. There are two ways to reduce this: flocked paper and baffles.

Flocked paper is a fuzzy black material that looks like very fine velvet. It is available from Edmund Scientific Co. at a very reasonable price. To line the inside, cut out separate pieces for each of the sides as well as top and bottom of the film chambers. Making a paper template first would be helpful. When they fit, glue them in place with contact cement.


Baffling involves making walls inside the chambers to block the reflections. These can be made of cardboard, brass or aluminum. Mine were K&S #255 aluminum .016 thick. These were 53x55mm frame with 33x40 square openings. A 5mm bent strip along the edges was also needed for securing. This was painted and placed to butt up to the edges of the spool well. A slight bend on the top was needed to accommodate the mirror well. Next, I made a second set of baffles to go closer to the film plane. For these I used K&S #173 3/16" angled brass. This is a strip of brass with a 90 degree bend across its width, perfect baffling material. I cut and bent it into a couple of squares 57x53mm, painted them matt black, and stuck them inside 16mm from the film plane. All baffles were secured with contact cement.


Light Leaks

My first suggestion is to paint all shiny or metallic surfaces inside or around the doors with flat black enamel, especially the inside parts of the back lock. Next line the space between the doors with a strip of black velveteen using contact cement. Velveteen can also be used as a baffle around the inside hinge area. Attach strips on the inside door where the hinge meets. Attaching some thin black string, like crochet wool, to the inside grooves may be effective as long as there is room. If the above method doesn't work, more drastic measures may be needed.

 
One method is a camera bra. It has a similar function to the camera case, but it's more light tight. Using 1/8" matt board from a framer or art supplier, cut four pieces to cover the bottom, back, and sides. Leave about 1/8" each dimension, and leave an extra 1/8" width for the sides and bottom. Cut a hole for the film counter, measuring from the top of the board. Also cut a hole for the tripod socket, measuring from the front. Now tape these together with duct tape. It should fit loosely from the bottom and back. Now cut two pieces 2 1/2"x 3", and glue these vertically to the inside of the back, one butted up to each side. This gives a little groove for the door lock. Now cut 1/2" wide strips of matt board for the side, tops, and back. Cover the inside with black velveteen,and the outside with vinyl. A piece of vinyl attached to the front top corners of the sides will secure the front. You could even add latches for a strap.
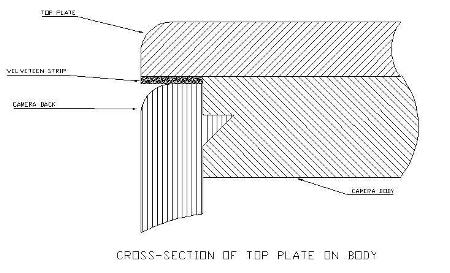
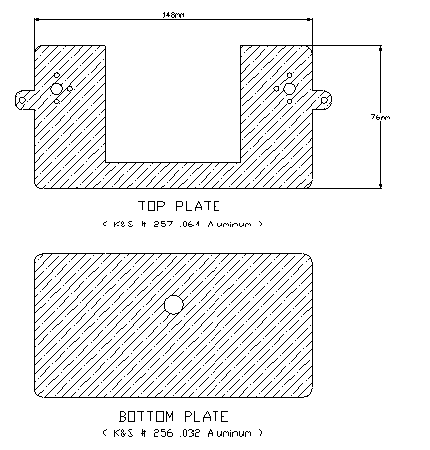
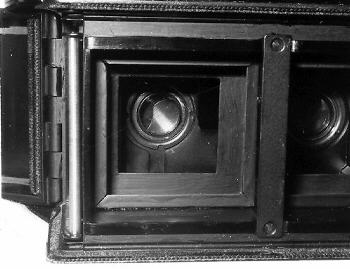
The most effect option is to make a brass or aluminum plate that completely covers the top and bottom of the body. The top piece will be c-shaped to allow for the viewfinder, with holes for the knobs. If you drill holes in the top plate to allow for the six screws that attach the knob assemblies, you can simply attach the top plate with those screws without having to glue. This will cause the film posts that fit into your spools to not fit all the way down into the spools, so some modification would have to be done to the knob assemblies. You may also want to make little protrusions to hold the lug straps, especially if you don't use a case. The bottom will have a hole for the tripod mount. Attach velveteen around the door edges of the plates, then glue the base to the bottom using contact cement. The advantage to this method is that it allows you to include lugs for your camera strap as well as a flash shoe.


Reducing lens flare

Loosen the tiny set screws around the lens mount (three to a lens) Just loosen them enough to remove, or you'll lose them ! Pull off these covers. You'll see a ring clip holding the middle element in place. Carefully remove these clips with a dental tool or small screwdriver. Don't let it spring! Hold a tissue over the front of the camera and face the camera down. The middle elements should drop out. These are the ones that desperately need the edges coated. A good quality permanent black marker should work. Cover the edges as well as the etched bevel that forms a 45 degree ring around the optic. After they have completely dried, dust off and replace. You may want to do further dusting with a dust gun as well as clean the other optics while you are in there.


Lens shades

These are definitely a must. Some Sputniks did have them, but if yours doesn't, try the following:

Advance Problems

Another common problem is a sticky advance knob. It can bind and be very hard on the fingers. Removing the advance knob and assembly, cleaning off the old lubricants and replacing them with a little vaseline or a proper non-migrating lubricant will help performance a little. The next option is to replace the original knob with a bigger one. Removing the tension spring will reduce friction, but you would have to instal a ratchet gear inside to prevent film slippage.


Cosmetic and Other Modifications

  • Since I'd done so many modifications, I decided to also give it a Mod look. I used a textured splatter paint to liven up an incredibly ugly camera!
  • The shutter trigger is too small and hard to find. Other than attaching a new trigger mechanism to the side, you could try using an accessory release that screws into the cable release socket. These should be available at used camera stores.
  • The tripod screw mount needs a 1/4" insert to use with standard tripods. These should be avialable through most camera dealers.
  • Although I really hate the viewfinder, I've left it intact for the time being. I would like to replace the big viewing lens with a ground glass, then add a prism to the top, like the 45 degree prism the Russians made for their Hasselblad copy, the Kiev.
  • On my version, I've installed a flash shoe on the top plate. This was salvaged from an old folder and attached to my top plate with screws. I use a Sunpak Auto Zoom 2400 with several tilt positions. Placement of the shoe will depend on the type of flash you use.


General Clean and Lube

Lens cleaning is pretty straight forward, just be sure you use the appropriate lens cleaner and tissue. Focus lubricants must first be removed with a distillate like naptha, then replaced with a non-migrating lubricant.

I would like to thank John Bercovitz, Joel Alpers and Greg Erker for suggestions in this guide. If you have any comments or suggestions for this page, please email me at: 3dhacker@cadvision.com


Rocky Mountain
Memories
Return to RMM Stereo Camera Repair index
Return to RMM 3D Encyclopedia index

[Contact Us]    |    [Home]    |    [Order Form]